Install the Classroom Spy Agent on a Local Network
To start monitoring your student, you need to install the classroom management software in your classroom.
The application consists of two modules that must be installed:
- Classroom Spy Professional Console (see Install Console)
- Classroom Spy Agent
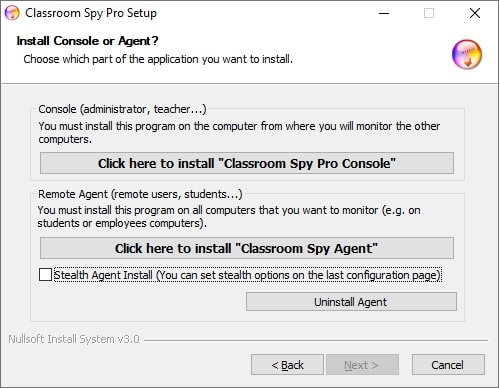
The "Classroom Spy Agent" must be installed on all student computers that you want to monitor. To do this, you must have administrative privileges.
Agent can be manually or remotely installed.
Manual Installation (Preferred)
To manually install an agent please go to student computer and run the installation program.
In the first installation window click on second option Install "Classroom Spy Agent".
On the end of installation you will have to configure an agent. To do so please read the chapter Agent Configuration.
Agent can be installed in stealth mode (select "Stealth Agent Install" checkbox).
In such way no program group is created, application does not appear in Add/Remove programs and no icon is displayed.
Agent Configuration
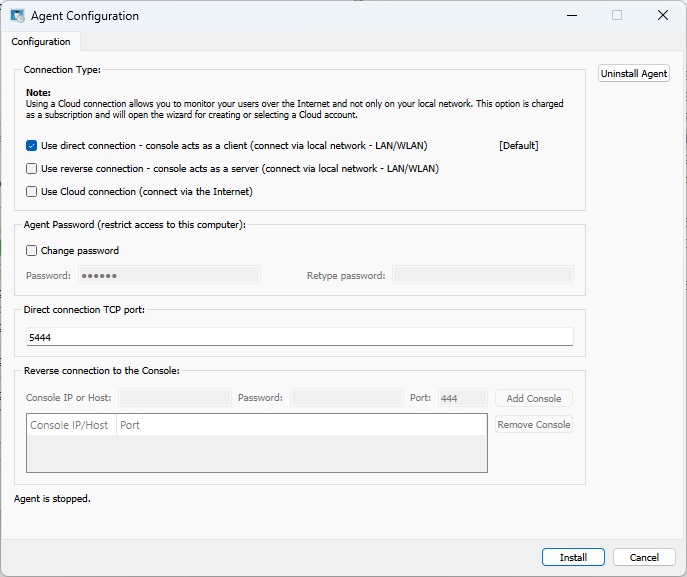
During installation, you need to type the password that protects the configuration and access to the agent. Here, simply select one password and remember it. Note that the default port on which the agent operates is 4495. You can change this port during installation or, later on (Advanced Configuration tab). If you use a firewall, you must open the used port.
Under Connection Security, choose End-to-end encryption (the original built-in encryption) or TLS, the same protocol used to secure web traffic - the console must be set to match, or left on Auto. When TLS is selected, the agent shows the certificate's fingerprint with a Copy button so it can be read or sent to whoever confirms it on the console side, and "End-to-end encrypt traffic also for TLS" is checked by default.
Connection Types
Direct Connection
It uses a direct TCP/IP connection between the admin console and the agents. The console acts as a client and the agent as a server. Direct connection works, e.g., if all computers are on the same network or proper routing is configured between subnetworks. The used port (default TCP 5444) must be enabled for communication.Reverse Connection
It uses a direct TCP/IP connection between the admin console and the agents. The console acts like a server, and the agent as a client. Reverse connection works, e.g., if all computers are on the same network or proper routing is configured between subnetworks. You need to enable "Console Reverse connection Server" in the console. You need to specify console(s) host-name or IP to which agent will connect. The used port (default TCP 444) must be enabled for communication.Cloud Connection
You can choose to make this computer accessible also via a Cloud connection by selecting "Use Cloud connection," which allows you to monitor the computer over the Internet.
Cloud license is subscription based. Read more about installation to the Cloud.
Remote Agent Installation on Windows
Remote agent installation is possible only on NT based operating systems (Windows 7,8,10,11) with administrative privileges. Please note that used port will be automatically open only on Windows Firewall. On all other firewalls you will have to open this port by your self. Remote installation can be done on LAN, WLAN or VPN. The remote installation over the Internet is not possible unless you use VPN network.
To start remote agent installations click with right mouse button on computer in a list.
Object menu will aper:
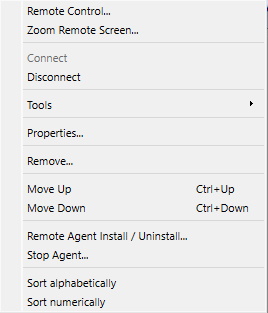
Choose Remote Agent Install / Uninstall (Windows).
After that this login screen will appear:
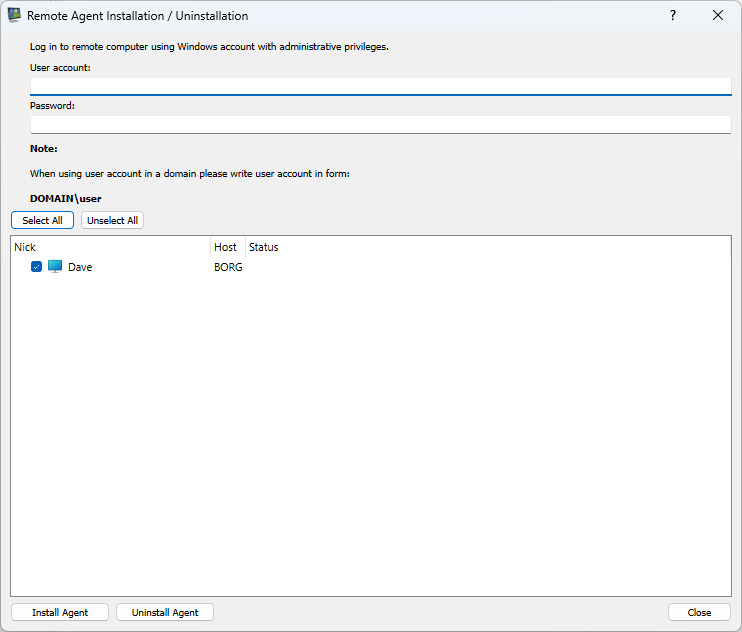
You have to enter the information about the user account on the student computer that has administrator privileges.
Remote Agent Installation on Linux (over SSH)
Linux agents can be installed and uninstalled remotely over SSH, from a console running on any operating system (Windows, Linux or macOS). The console obtains the correct Linux agent files as needed - either bundled with the console or downloaded for this brand - and installs them on the remote computer through an encrypted SSH connection.
Select one or more Linux computers in the list, click with the right mouse button, and choose Remote Agent Install / Uninstall (Linux).... The same command is also available in the File menu.
In the dialog, enter the SSH connection details for the remote computer(s):
- SSH user and SSH password - the account used to log in over SSH. Instead of a password you can choose a Private key file for public-key authentication; the SSH password field is then used as the key's passphrase.
- SSH port - the port the SSH server listens on (22 by default).
- sudo password - installation requires root privileges. Leave this empty if the SSH account is root, or if its sudo password is the same as the SSH password; otherwise enter the sudo password.
Select the computers and click Install Agent or Uninstall Agent. The status and progress are shown for each computer, and the buttons become available again once every computer has finished, so you can adjust the details and retry if needed.
NOTE:
The agent's port is opened automatically only where the ufw or firewalld firewall is active; with any other firewall you must open the port yourself.
Update Agent
If this console has a newer agent version available, you can push it to already-installed agents remotely, without a full reinstall.
To update an agent, select one or more connected computers in the list, click with the right mouse button, and choose Update Agent... from the menu.
The console sends the new agent files to each selected computer and only replaces the existing files once every new file has been fully and correctly received, so an interrupted or failed update never leaves the agent in a broken state.
Click Run in Background to keep working in the console while the update runs - progress for all selected computers is then shown in the status bar.
NOTE:
The console can only update agents running on a platform (Windows/macOS/Linux) it has agent files for, either bundled locally or available to download for this brand. If neither is available, the update for that agent fails with an explanation instead of guessing.
Uninstall Agent
You can remotely and completely remove an already-installed agent from a computer, without needing physical or file-share access to it.
To uninstall an agent, select one or more connected computers in the list, click with the right mouse button, and choose Uninstall Agent... from the menu.
The agent is stopped and its entire install folder is removed - including any files or folders the console does not otherwise recognize - so nothing is left behind.
Click Run in Background to keep working in the console while the removal runs - progress for all selected computers is then shown in the status bar.
NOTE:
This permanently removes the agent from the computer. Monitoring for that computer stops immediately and cannot be resumed without installing the agent again.
Remote Agent Deployment over Active Directory Using MSI Package
MSI package for agent that can be used for remote deployment over Active Directory can be downloaded here:
https://dwn.classroomspy.com/classroomspypro_agent.msi
It can be installed like this:
msiexec /i classroomspypro_agent.msi PASSWORD=myAgentPassword /qn
You need to deploy as usual using package classroomspypro_agent.msi and specifying a MSI property
PASSWORD=myAgentPassword
The myAgentPassword is the password you want to use.
By default the agent uses end-to-end encryption for its connection to the console. To use TLS instead - the same protocol used to secure web traffic - add the USE_TLS property:
USE_TLS=Y
When TLS is used, end-to-end encryption is also layered on top of it by default (the same as the agent's "End-to-end encrypt traffic also for TLS" option); to use TLS on its own instead, also add TLS_WITHOUT_ENCRYPTION=Y.
NOTE:
You need to install Monitoring Console in the same network as student computers that you want to monitor.