Install on ChromeOS (Chromebook)
For monitoring ChromeOS (Chromebook) devices, you can use Cloud connection and/or Reverse Connection.
If you want to use Cloud connection then make sure that you already created the Cloud account as descibed here.
Console Configuration - Reverse Connection Server
To use a Reverse connection, you must enable a "Reverse Connection Server" in the console.
You can do this in the menu "Connection / Configure Console Reverse Connection Server":
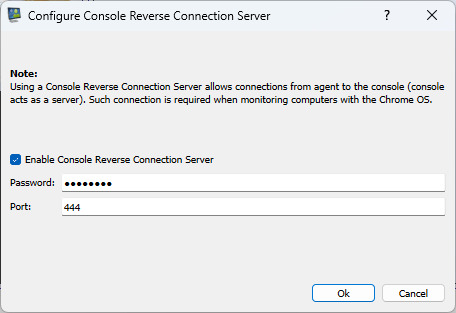
Set a Reverse Connection Server password. In addition, you may need to open port (TCP 444) on your firewall (console computer).
Installing the Chrome Extension on ChromeOS Device (Chromebook)
You need to install the Chrome extension to monitor a ChromeOS device (Chromebook).
Chrome extension can be installed manually or deployed using Google Admin Console.
Manual Installation of Chrome Extension
To do so, please install the following Chrome extension on your ChromeOS device (Chromebook):
https://chromewebstore.google.com/detail/classroom-view-pro/ekabgjkfjjamlheclbclomdbkijhndjh
Configure the Chrome extension like that:
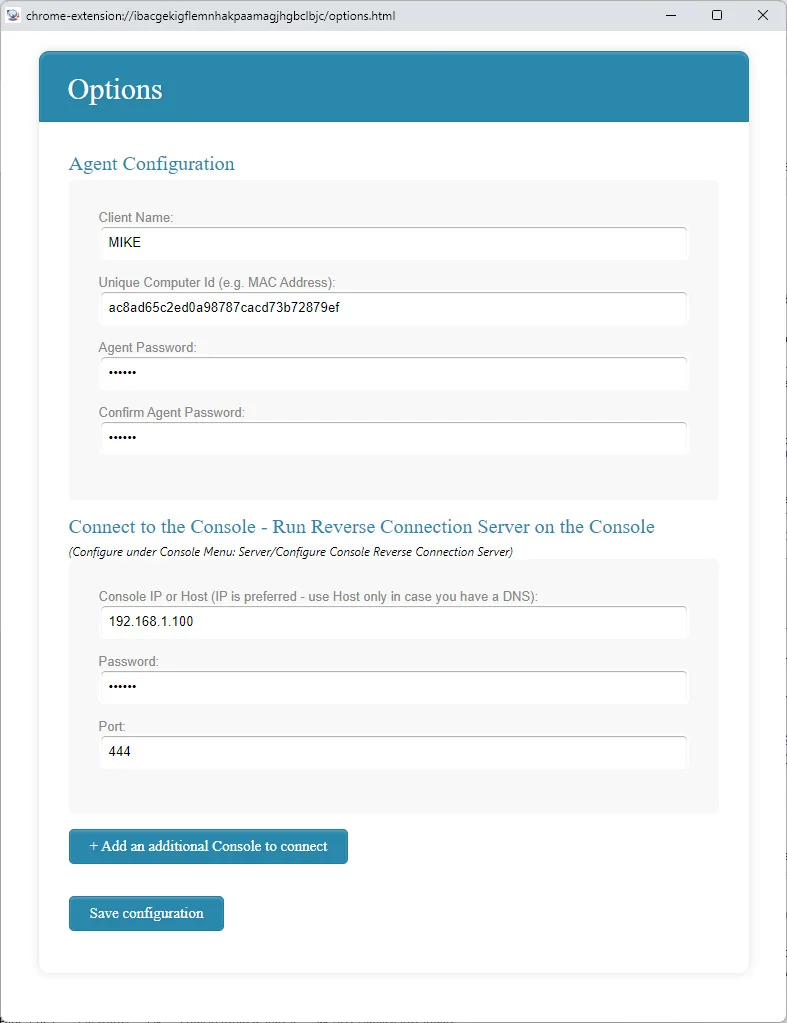
First select the Agent password that you can remember.
If you are using a reverse connection, then you must configure the extension by setting the console's IP and Reverse Connection Server password specified in the previous step.
To use more than one Console, add the authorized Console addresses with + Add an additional Console to connect. The Chromebook must have a working route to each configured Console listener, such as the school network or an authorized VPN.
If you are using a Cloud connection, then you must configure the extension by setting your existing Cloud account and password.
Chrome Extension deployment using Google Admin Console.
Chrome extension can also be deployed using Google Admin Console.
In such case you need to prepare a proper JSON Policy that can be used during deployment.
Use the console menu "File / Configuration" to generate JSON Policy that is based on your configuration data:
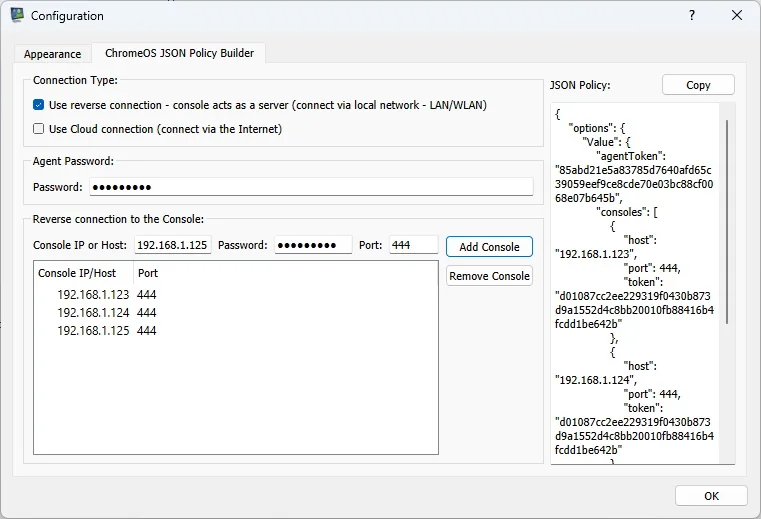
ChromeOS JSON Policy Builder and its generated policy.For a reverse connection, the Chromebook initiates the connection to the configured Console. Keep the Console running and verify a reachable network route and its configured listener port. A Cloud connection is a separate route for devices on different Internet-connected networks.
Record the ChromeOS Desktop
ChromeOS agents can record desktop screenshots directly to external storage. They do not store recordings locally on the Chromebook.
Configure an S3-compatible, Google Cloud Storage, Azure Blob Storage, or WebDAV profile under File / Configuration / External Storage. Then select that profile as Recording storage on the Desktop Recorder tab. The storage endpoint must be reachable from the Chromebook.
For provider-specific setup steps, see External Storage. Recording quotas, automatic deletion of old recordings, scheduling, screen-change detection, and optional end-to-end encryption also apply to ChromeOS recordings.
Add ChromeOS Device (Chromebook) to the Console
If you are using a Reverse Connection, you can add Chromebook using the menu "Connection/Add Computers from Console Reverse Connection Server".
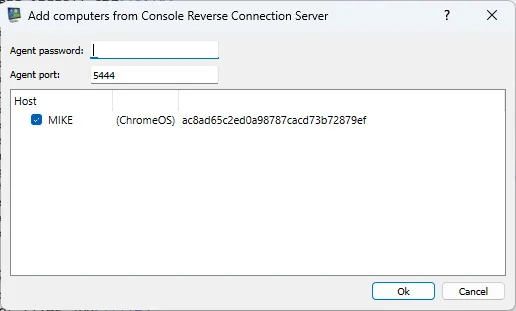
If you are using a Cloud Connection then add Chromebook using menu "Cloud/Add Computers from Cloud". The example below follows the current Console policy builder's JSON structure and replaces its credential tokens with explicit placeholders. It is valid JSON but is not deployable. Generate your own policy with Download the sanitized policy example. Supply the Agent password in the builder. For Cloud, configure the account in the Console; the builder emits For recordings, use ChromeOS-compatible external storage and recording encryption. No local Chromebook recording files are created.Policy example and a one-Chromebook check
File / Configuration → ChromeOS JSON Policy Builder; do not replace tokens with plain-text passwords.{"options":{"Value":{"agentToken":"GENERATED_AGENT_TOKEN","cloudAccount":"school-cloud-account","cloudAccountToken":"GENERATED_CLOUD_TOKEN","consoles":[{"host":"teacher-console.school.example","port":444,"token":"GENERATED_CONSOLE_TOKEN"}]}}}cloudAccount and cloudAccountToken. For reverse connections, add each Console host, port and server password; the builder emits the consoles array. Keep generated tokens confidential. Only enabled connection modes appear in the generated policy.chrome://policy and use Reload policies. Check that the extension policy is present without policy errors. See Google's managed-extension verification steps.Cloud / Add computers from Cloud. For reverse mode, use Connection / Add Computers from Console Reverse Connection Server.Remote Screens updates for the intended Chromebook. Policy application, connection and screen capture are separate checks.